How to grip a Skateboard Deck
Introduction
Gripping skateboard decks is a technique that will only improve after practice like skateboarding itself. If you are new to the skill then here is a guide of everything you will need to know on how to grip yourself a deck. Although before we get started and if you are not yet ready to take the plunge into learning then at The Black Sheep Store we will happily grip any board under the width of 8.75". May I also add that grip tape is an essential part of any skateboard set up, this is because it provides that necessary traction that will keep your feet in place.
(Roughly the measurements of any sheet of grip will be 9 inches wide and 33 inches in length.)
Tools Required
A Stanley blade (the sharper the blade the easier it will be when cutting the excess grip off)
A file (to grind down the edges of the grip)
Directions
You may have seen skateboards that have fancy designs on the individuals grip tape. For example it could be a cut out design in the grip tape that showcases the graphic on the top of the skateboard deck. Some people also like to do general patterns using different colours and types of grip. Once you have mastered the initial skill you will be able to experiment but for now lets keep it simple with the basics :
Step One - Placing The Grip Onto The Deck
Firstly find a flat surface with enough space around it, then place your deck on your chosen surface/area. You may also want to use some kind of material beneath your deck like some old carpet. This will save yourself from scratching the skateboard graphic before it has even been skated.
Grip tape is pretty much like a big sticker and as any sticker you will need to peel off the paper backing in able to use it. In this case though once you have peeled the backing make sure to keep it because you will need it in the near future.
The best technique in placing the grip on is to pinch each side of the grip tape (length ways) with your thumb and index finger. Pull the grip tape flat and slowly hover it over your deck but make sure it doesn't touch your deck just yet. Then use the rest of your fingers to feel for each end of the deck (nose and tail). This will allow you to place the grip tape down whilst making sure the whole length of your deck is covered. To make sure it is also covered width ways simple look directly above the grip tape and deck and if you can't see your deck under the grip then you can be pretty certain that it is totally covered.
It is now time to lower your grip as lightly as you can so the grip and deck start to touch at both ends. Slowly take your hands away and the grip that should now be in place although not fully stuck down. The next step you will need to grab the paper backing that you saved earlier on and place it directly on top of your grip. Then from the middle push down quite firmly allowing the grip to stick to the deck. Work your way up the board to both the nose and tail pushing out any air bubbles that may have occurred during the process. Once you are happy and it feels stuck down all over you can remove the paper backing.
If you have any air bubbles showing then you can push the air out by pressing down on the bubble, guiding the air to the edge of the deck. Another technique is to pop the bubble by using your blade. This is stage one complete, it is now time to file down the edges.

Step Two - Rounding Down The Edges
Step two is all about making sure the grip tape is securely stuck down as well as rounding down the edges. The whole point of doing this is to make it easier for yourself when you reach the final stage which is cutting.
You'll now need to get your file/Stanley blade ready then take your Stanley blade and being extra careful cut four slits into the over hanging grip tape where you would imagine the wheels would be if it was already set up. There is a slight bump in the concave of most decks, that'll be the perfect spot where you should make these incisions and the reason for doing this is because when you take your file and file around the edge of the skateboard, the grip will stay in place and won't pop up in any areas or crease.
When filing down the edges you should hold the file at an 45 degree angle pointing towards the middle of the deck, slowly work your way around the deck. As you do the outline/shape of your skateboard deck will appear. Once you have the outline you can then file a little harder but do not file too hard to the point where you file all the way through the grip and onto your deck.
The reason why we do this is because by grinding down the grip tape down along the edges of the skateboard it will provide a secure edge that won't peel off too easy when out skateboarding. It will also make it a lot easier to see where to cut off the excess grip tape and will act as a guideline which is the final and last step when it comes to gripping a deck.

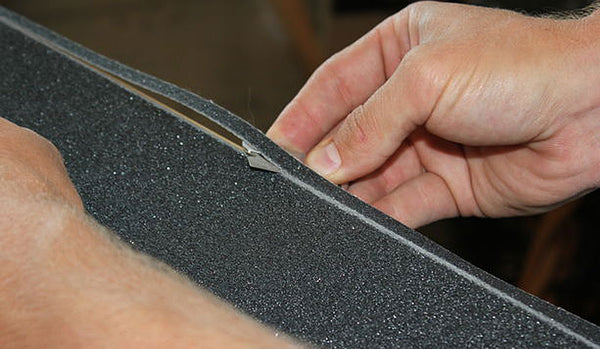
Step Three - Cutting Off The Edges/Excess Grip
Using your sharp Stanley blade carefully cut off the excess grip tape by following the white line that you made whilst filing the edges down during the previous stage. With the cutting techniques some may vary but I always cut from below and towards yourself and with using any sharp tool you must be extra careful as there will always be a danger of harming yourself.
Use the outline of the deck which appeared when filing it down as your guideline, it is also the best place to cut as you have already made the grip weaker in that area meaning it'll be a lot easier to cut through.
Another bonus for making the four incisions during the filing stage is that you can cut the grip off in four stages rather than the whole thing in one cut.
Once you've carefully cut all the way around your deck and you now have what looks like final gripped skateboard deck then there is one thing left to do. Grab the file again and file down the edge of the skateboard, this will make sure that the grip won't peel off and it will also give you a smoother finish.
That is our guideline on how to grip a skateboard deck. As I mentioned before practise makes perfect so if you didn't nail it first try then don't hesitate to try again in the future.
Brands Of Grip Tape That We Advise
How To Remove Grip Tape From A Skateboard
Firstly you will need to remove your trucks from your deck. Next you should get yourself a hair dryer, any will do with a heat setting then at either the tail or nose of the deck blow hot air on the grip tape. This will although the adhesive to loosen slightly allowing you to then take a blade of some sort (Stanley blade will be perfect) and slide it under the edge of the tape in between the deck and grip. Start at one side and work down or up the board, length-ways often works best. Once you've peeled up some of the grip you can then use your fingers to start pulling the grip away from the deck. If it becomes difficult again then simple use the hair dryer to loosen the adhesive as you did at the start. Rarely the grip will come off in one go so don't be alarmed if it tears and you have to do remove it in small individual parts.