How to build a Skateboard
Introduction
Assembling a skateboard is fairly easy, but like most things worthwhile, it will take some patience and understanding. We are more then happy to assemble any skateboard purchased from The Black Sheep Store although many skaters like to do it themselves. If you are an individual who would like to learn how it is done then have a look below as we have the necessary basics that will guide you through the process.
Equipment and Tools
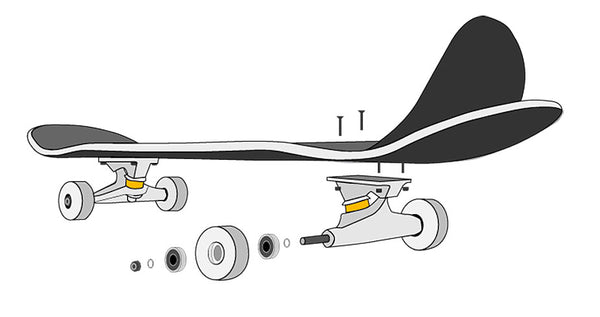
To start off with lets make sure you have all the needed components and tools that are required when building a complete skateboard :
Hardware/Bolts (8)
Either Allen Key or Phillip's bolts will do, it is your preference.
Trucks (2)
The trucks featured on our website are priced for a pair not a single truck. This may not be the case at all skate shops so double check you are buying as a pair as one truck is useless. Trucks will also need to match, this is very important.
Bearings (set of 8)
Each wheel requires 2 bearings, giving you a total of 8.
Wheels (4)
Wheels come in a set of 4 and will all be the same size/shape/hardness, do not mix and match.
Gripped Skateboard Deck (1)
If your deck hasn't already been gripped then our 'How To Grip A Skateboard Deck' page will give you the needed instructions on how to grip your deck.
Skateboard Tool
If you do not have access to a skateboard tool then an adjustable spanner and an Allen key or Phillip's screwdriver will do. Depending on what hardware/bolts you will be using make sure you use the right tool. Considering your standard skateboard tools don't cost that much I would advise purchasing one. Click on the link to scope out our tools that are available to buy.
Building A Complete - Directions
If you have all the above then it's time to get started...
Mounting The Trucks
If your deck has already been gripped then the first step is to poke through the bolt/screw holes with a thin sharp object. Be careful as you go because you don't want to poke through into your hand. Now grab your 8 bolts (Hardware), if they are joined you will need to separate them. Place each bolt into each hole on the gripped side of your deck. You can now slip the base-plate (bottom part of the trucks) onto the bolts. If you are using risers you will want to place them on first (in-between the base-plate and deck.) Once you have applied both trucks, making sure the kingpin of each truck faces towards each other then you can now apply the nuts to the bolts. Now they're in place fasten them securely using your choice of tool. It is now time to get ready because the next step is inserting the bearings into the wheels then applying them onto the trucks.
Getting The Bearings Into The Trucks
With this step it is probably the hardest part of the whole assembly process. The reason for this is because you will need some strength unless you have a tool called a bearing press. This tool is not essential, you can manage just fine with your own two hands.
Firstly place your board on its side so the Griptape is facing away from you then simply take off the washers and nuts that should be attached to the axles on any one of the trucks that is facing towards you. Apply two bearings to the axle. If your bearings do not have shields on each side then you should place the bearings onto the axle so the shields face towards the middle of the truck. This is because when you insert them you will want the shields facing out of the wheel so that it stops any dirt from getting into the bearing.
Now you will have to separate the wheels from the packaging. Take one of the wheels and using overhead pressure, push the wheel on top of the two bearings. This will insert the top bearing into the centre of the wheel. If you have applied too much pressure and both bearings seem to have been inserted then use the axle of the truck to carefully remove the second bearing. You should now be left with one bearing sat on the axle with another inside the wheel. The next step is to turn the wheel around then use the same technique to apply the second bearing. You should now have a wheel sat on the axle with a bearing in each side.
Remove the wheel from the axle then repeat this process for the other three wheels.
Attaching The Wheels To The Trucks
Now that all four wheels have their bearings inside, it is time to attach them securely onto the trucks. To start off with place your board on its side as done previously in the last step. Then take off the axle nuts and remove one of the washers (generally all trucks come with eight washers and that should be two locked onto the axle where you would expect to see the wheel.) Place your wheel onto the axle the right way around so that the graphic is facing out away from the board. Place the other washer on top of the wheel then re-attach the nut onto the axle. Use your skate tool and tighten the nut fully. You may feel the bearings starting to press into the wheel further more which means you didn't apply enough pressure when fitting them. Although don't be afraid as that is not a problem. You will now have to loosen the nut ever so slightly leaving a little bit of space/slack for the bearings to almost breath. That will relieve the pressure when using your skateboard and prevent the bearing from popping. Repeat this process for all four wheels then you have finished putting together your skateboard from scratch. If you have had any problems along the way then please don't hesitate to call us on 0161 238 8641 or send an email with the advice needed to contact@blacksheepstore.co.uk
For More Infomation On The Individual Parts Of A Skateboard Take A Look At Our Other Pages Below :
Skateboard Trucks Buying Guide
Skateboard Wheels Buying Guide
Skateboard Bearings Buying Guide